In this chapter, we are going to cover the basic steps to record your first song at home, which includes the recording, editing, mixing and mastering process.
These days, with advancements in DAW technology and multitrack recording, most home musicians can produce a very decent song by just by recording solo.
Even as you read this, some of best soundtracks are being recorded at home, in the garage or at the basement right NOW…
While it’s not easy to pull off, the process is simple and relatively straightforward.
The 4 Stages of Music Production
The music production process involves 4 basic steps:
- Stage 1: Recording (where you record individual tracks and combine them to create the ‘song’)
- Stage 2: Editing (where you edit and comp each individual track to give them the best possible sound)
- Stage 3: Mixing (where you mix all the individual tracks into a cohesive song)
- Stage 4: Mastering (where you master the songs in your album for them to sound as a coherent whole – by making them sound like they are from the same album)
Let’s break down these stages in more detail…
Stage 1: The Recording Process
When you start recording, you don’t record all your instruments and vocals together in one go…
Instead, most musicians record instruments, vocals and drums in separate individual tracks in a process known as tracking.
What is tracking? (or multi-tracking)
Tracking (also known as multitrack recording) is a process where you record various instruments, tempos and vocals in separate tracks which you then later combine to create a song.
Why would you do this?
Back in the day, a single bad musician in the band could ruin the entire recording…
Nowadays, due to advances in DAW technology and tracking, you can simply replace any bad parts out of the audio recording by overdubbing and editing.
This means that you don’t have to redo the entire part and play the instruments all over again…
Tracking can be done either solo or with more than one musician playing at the same time…
This gives us 2 key advantages:
- If you have more than one musician in the band, each musician can even record at different times and different places as all the different tracks can be combined into one later.
- For most of us that are recording solo, multi-tracking allows you to record your instruments separately so you can combine them in your DAW later.
If you are a multi-instrumentalist, you can even create own virtual band even if you are recording everything solo!
How to record tracks
1. Create a click track for your song
Start by creating a click track for your song.
The click track sets the beat and tempo for your entire song. For your other rhythmic instruments to be precise, you need to follow a base track which will serve as a guide for the drums, rhythmic guitar and other instruments.
This is essential to make sure that all individual tracks sync with one another when layered together.
To create a click track, you can either set this in your DAW or even use a pre-recorded drum loop for your base track as long as it fits your desired tempo.
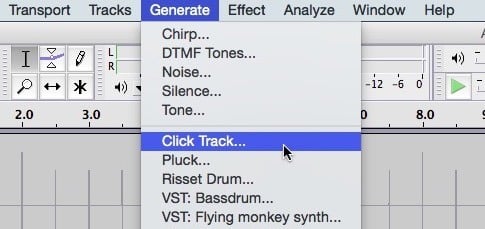
A digital metronome which you can download and use on your phone also works.
Next step…
2. Record the bed tracks / rhythm section

The bed track (or rhythm section) is the foundation of your song. This is the part of the song that provides the rhythmic structure.
Bed tracks can be created with just bass and percussion instruments, or other melodic instruments such as drums, bass and rhythm guitar.
Together, these instruments form the rhythm section which is really the foundation of any song. This is because when a band plays together, everyone follows the drums and bass.
If there are no drums or bass, then an acoustic guitar can be used to create the rhythm of the song.
Once the drum section has been tracked and edited, you can edit the other parts of the rhythm section by punching in, editing or reordering sections together.
Next step…
3. Recording Harmonies

Once you have built the basic rhythm structure of your song, the next step is to record harmonies.
You can use various instruments including acoustic guitar, piano, synths, etc. to create harmonic structure for your song.
When recording harmonies, you should predetermine which instruments to use and the chord progression for each instrument so that you can save time and costs.
If something doesn’t sound right, you can cut and splice those harmonies during the editing process.
Next step…
4. Recording Melodies

The melody forms the dominant part of your song, so this part will mainly consist of lead guitars and guide vocals.
Once these are done, you can continue with supporting melodies or separate melodies that you wish to add to your song later.
The key advantage of multi-track recording is that you can choose to include or exclude these additional melodies if they don’t fit into your song structure.
Next step…
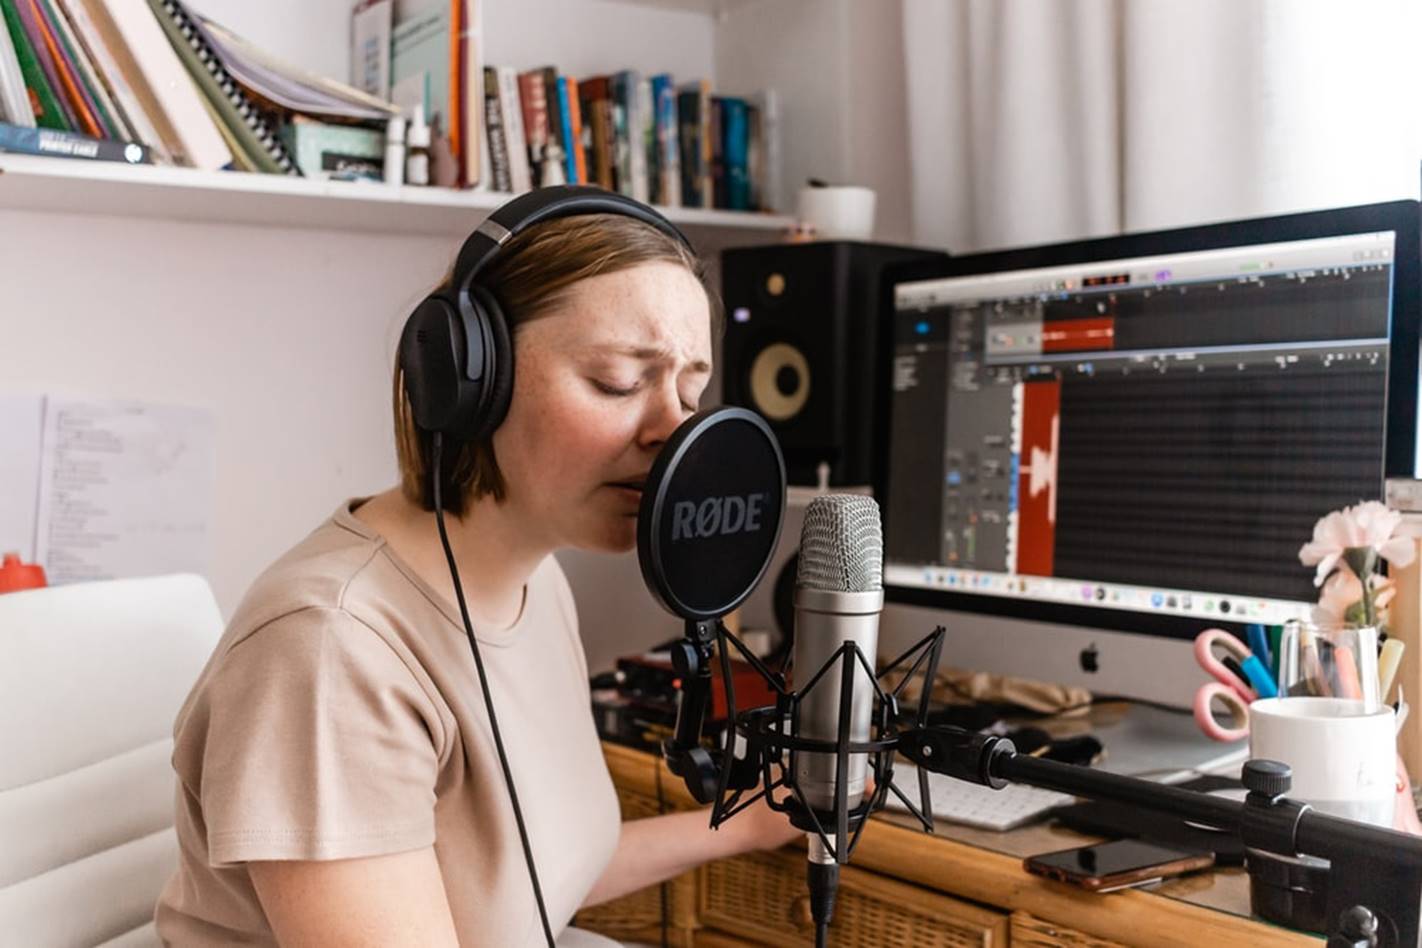
5. Recording Vocals

The final step is to record lead vocals into the song so that the final tracks can be created and play together with the entire melody.
Be sure to record several takes when recording vocals – this will save you time during the editing phase if you discover out of tune notes or phrases that aren’t in sync.
You’ll eventually need to comp your vocals to create the best possible version of your song – so it’s always better to have multiple takes rather than one.
For a detailed guide on how to record vocals at home, check out this post:
And finally…
6. Adding color and sound effects
Now that you have a nearly finished product, I usually like to add some color and sound effects to your recording to make them sound even better.
Here are some common techniques:
- Piano fills
- Percussion fills
- Background vocals
- Guitar fills
- Reverb effects
- Loop effects
Depending on what DAW you use, you can add additional color and unique sound effects to emphasize certain instruments or highlight certain nuances in your song…
Up next…
Stage 2: Editing
Editing is the process of changing the original recording by altering the pitch, speed, volume, timing, EQ of an individual track or the combined tracks.
The goal of editing your tracks is simply to make the sound even more convincing.
Editing Techniques
In your DAW, you can edit your soundtracks using the follow techniques:
- Comping
- Trimming
- Tuning
- Gain Staging
- Noise Reduction
Let’s go through some of the most popular editing techniques…
1. Comping
Comping is essentially the process where we take the best parts of your track and piece them together to create a ‘perfect take’. This is done using ‘cut and paste’ and ‘splicing’ your tracks.
Although comping can be done on any instrumental track, it is mostly used when editing vocals. This technique involves:
- Keeping track of the best takes while recording
- Dividing between the silent parts of each track to make the transition sound smoother
Most DAWs today come with a comping feature, for example, Ableton Live and Logic Pro X allow you to record loops of multiple takes without breaking the flow.
In Pro Tools, you’ll need to stop the recording and create a new playlist on the same audio track for every new take.
2. Trimming
Aside from comping, we use trimming to cut away sections of the song where the vocalist was not performing or editing out breaths that stick out too much. Sometimes you may wish to keep these sections in your mix depending on the style of music you create, otherwise you can just trim them out.
For trimming breaths, you can use a plugin like DeBreath that works pretty well.
3. Tuning
The next step is to touch up the pitch and tuning imperfections in the vocal recordings. If you are planning on doing this at home, I would recommend a pitch correction software like Waves Tune Real-Time.
When applying pitch correction, it’s a good idea to commit the effects into the mix to save processing power during mixing.
4. Gain Staging
We use gain staging to make sure the volume of your tracks is consistent and coherent. This involves looking at all your instruments and vocals and making sure that they are loud enough to be heard clearly (and not loud enough to distort the audio).
In the editing process, you should first get the clip gain to a healthy ballpark or set out the dynamics manually. This is a vital step in making your song sound professional.
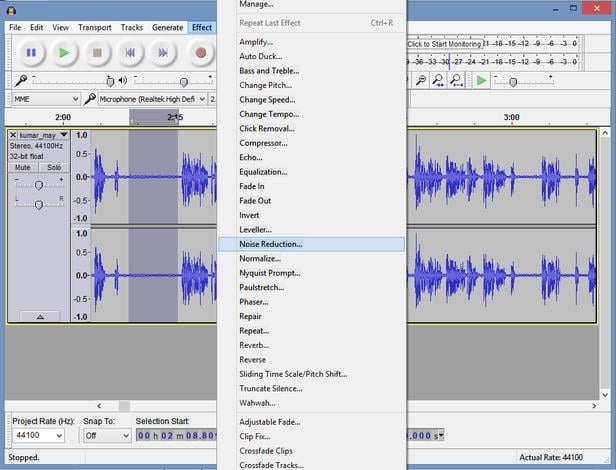
5. Noise Reduction
We use noise reduction to remove unwanted sounds and noises from your recordings – for example:
- Ambient noises
- Breathing noises
- Intermittent noises
Ambient noise can be tonal noise when it has fundamental frequency and harmonics, such as the microphone picking up humming from laptop monitors and heaters.
Intermittent noise can be anything from sudden footsteps to vehicle horns, which can be present if you are recording in a home setting.
If you are looking for a free piece of software to reduce audio noise, I recommend Audacity.
Stage 3: Mixing
In the editing stage, we discussed how each track is edited to contain the best possible sound performance for that particular track…
But NOW the problem is that you now have individual tracks that sound like they were made separately…rather than one single cohesive song.
To achieve cohesiveness, we use a process called mixing.
Mixing is essentially the process of combining individual tracks and making them sound as one coherent track.
Mixing Techniques
The core mixing techniques are dealt with in the following order:
- Volume adjustment
- Panning
- Frequency equalization
- Imaging
- Compression
- Effects
1. Volume Adjustments
We make volume adjustments to each track to ensure that all the tracks sound consistent and coherent. This means you have to go through each track to ensure every instrument is at the correct level of loudness that you want in the final song.
The goal here is to create a track recording that is ready to be panned, EQed and compressed.
2. Panning
We use panning to distribute the sound signal into a new stereo or multi-channel sound field.
While panning isn’t exactly an exact science, the ultimate goal here is to provide sound clarity for your tracks…
Some musicians like to pan the drum kits as though they are sitting directly behind it, while others push everything except the snare drums and kick completely to the left and right channels.
Bear in mind the Pan Rule while panning – as you pan tracks left or right, they gradually decrease in volume by up to 3db at either end. You’ll need to adjust the volume as you go along.
3. Frequency Equalization
With equalization, we vary the EQ of each recorded track after panning because they may be panned too close to each other (and start to sound overlapping or distorted). You solve this with EQ equalization to restore their fundamental harmonic ranges.
4. Imaging
When we talk about imaging, we consider each instrument’s frequency range in relation to all other instruments and make adjustments to bring clarity to tracks that are panned closed to each other.
This provides a sense of space and separation to your sound to emphasize certain instruments and vocal tracks in the song.
5. Compression
We use compression to dynamically tame the amplitude of each track’s waveform. This produces a consistent volume across all tracks and removes sudden spikes or dips.
That being said, high compression with low thresholds may sound better for pop and rock music, but will totally ruin a classical performance. You should apply compression techniques carefully!
6. Effects
We add effects such as reverbs or loops to highlight certain nuances in the song, or surprise the listener with some ‘ear-candy’.
Effects allow you to add subtle nuances in your song to highlight an instrument or melody – the choices here depend on your musical taste and expression.
Some example effects:
- Warm shorter reverbs with heavy compression create intimacy and ‘wetness’
- Longer, metallic reverbs and delays create a sense of depth
Up next…
Stage 4: Mastering
Have you ever listened to an audio CD only to find song #1 louder than song #2? Or song #3 sounding much more ‘boomy’ than song #4?
Chances are, this is a CD that has not been mastered!
If you intend to record an album, sometimes each song will have its own sound and ‘sonic feel’. Mastering is the process of making all the songs in the same album sound coherent and the same no matter where it is played or what system it is played on.
Simply put, you don’t want to record a song that sounds good only in your studio but terrible everywhere else!
By putting each song through mastering equipment and adjusting them to the same level, you can make them sound like they are coming from the same album.
The process of mastering audio involves a series of steps that haven’t really changed much over the years, but they generally involve the following:
- Setting the song order
- Editing
- Setting space between songs
- Processing, compressing and equalizing
- Levels
- PQ coding and ID tags
- Dithering
As explained above, the entire process of mastering is basically to make all your songs sound cohesive and consistent across the entire album.
If all of these sounds too complex – it’s because mastering is REALLY complicated – we have barely scratched the surface of what mastering a mix entails.
I really just recommend outsourcing this task to a sound engineer on Fiverr or a professional mastering house…
You might be wondering…
Is mastering necessary?
With advancements in DAW technology, more and more musicians are finding it possible to record and edit songs in their home studio. This saves alot of time and money as compared to hiring out a professional studio or mixing engineer.
That being said, there is still alot of debate going on on whether professional mastering is a necessity.
If a mix does not require additional modifications (i.e., all the tracks have the right volume, perfect equalization, compression, etc.) then there is no need for mastering. However, the chances of this happening especially for a home-produced recording is virtually ZERO.
Any home-recorded album would certainly benefit from being mastered by a professional sound engineer, not just to improve the sound quality but to make them sound like a coherent whole.
If you are spending alot of time and money to get the best equipment and DAW software, it’s really a no brainer to get your mixes mastered to further improve the sound.
If you intend to sell your mixes or albums commercially, getting them mastered is almost a definite MUST.
There are various mastering houses on the market that offer competitive rates – so be sure to check them out!
And that’s it!
Next Steps
Although we have touched on the steps for recording a song…
The most important part of the song is arguably the vocals…and ALOT of musicians struggle with recording good vocals at home…
In the next chapter, we’ll focus on how to record better vocals. Check it out here: