In this tutorial guide, we will demonstrate exactly how to use an audio interface and get started with recording your music in your home studio. If you have just started recording at home or recently purchased your recording studio equipment and want to learn how to set everything up, this is the guide for you.
An audio interface is an essential component of your home recording studio and it acts as the interface between your microphones, instruments, headphones, studio monitors and your DAW.
If you are starting off with something basic such as the Focusrite Scarlett 2i2 or the PreSonus Audiobox USB interface, these types of audio interfaces will come with 2 input channels at the front (one for the microphone and one for your instrument). Your setup should look something like this:
1. Setting up Cable Connections
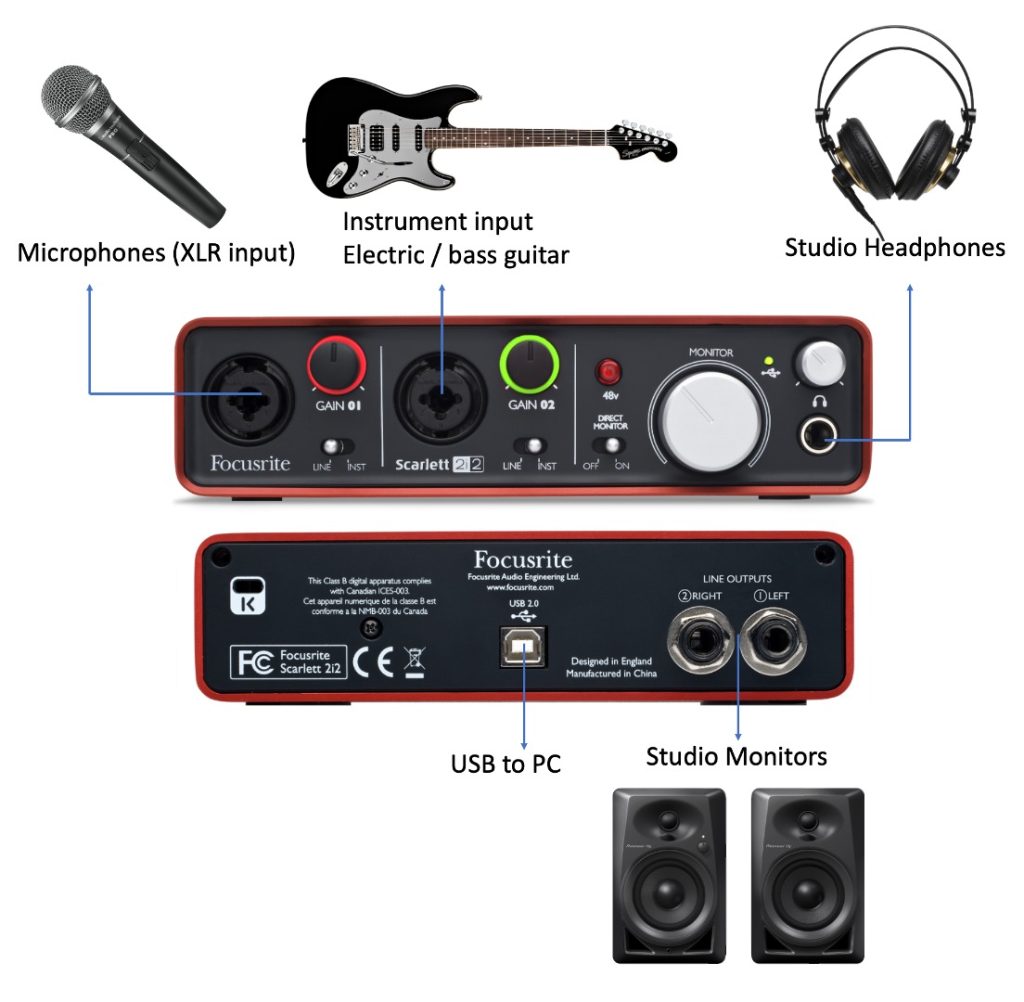
Microphone – Connect your microphone to your audio interface using a male XLR to female XLR cable. The male end of the XLR cable will be plugged into the audio interface, and the female into the mic. This usually goes to the first input channel which is usually located on the left. A good option is the Monoprice Premier Series XLR Male to XLR Female cable.
Instrument – Connect your instrument (usually an acoustic, electric or bass) to the second input channel in your audio interface. Most musicians will be using an acoustic guitar for this purpose.
Studio Headphone – This will usually require a 1/4” headphone jack (or use a 1/4″ adapter if not provided with the headphone) This goes into the headphone input in the audio interface. If you need a headphone adapter, the Cable Matters headphone adapter is a good option.
Studio Monitors – Check if your audio interface is using RCA or 1/4″ inputs (this should be located at the back of your audio interface) Some studio monitors have both RCA and 1/4″ ports for convenience – you just have to plug the ones that are compatible with your audio interface. If you need an interchangeable set of connectors to connect your studio monitors and interface, the Hosa Dual RCA Stereo connectors are a good choice.
2. Connecting audio interface to computer
After you have set up your cable connections to the audio interface, the next step is to plug the USB cable from your interface to your computer.
Connect the USB to your computer and download the driver from the manufacturer’s website if the driver does not install automatically.
3. Selecting your audio interface as the primary device on your PC and DAW
You need to do two things:
(a) Select your audio interface as the primary output device on your computer
If you are running on Windows, you need to go to Control Panel and Sound Settings. Navigate to the settings and select your audio interface as the output device.
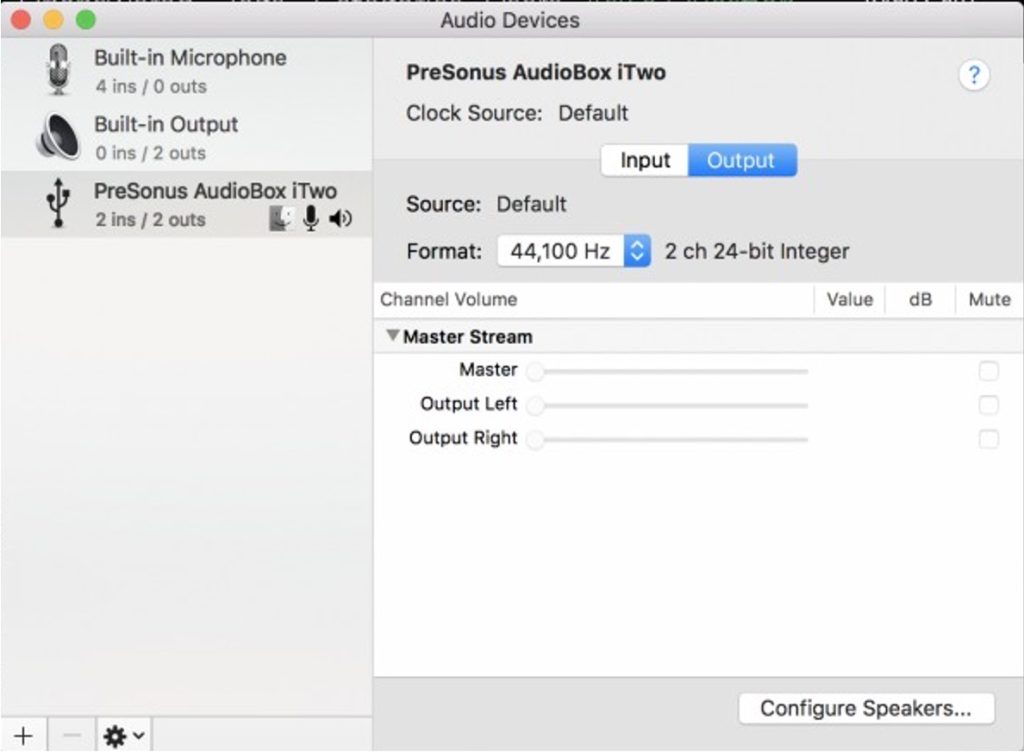
For Mac computers, you need to go to “Sound” in system preferences and select your audio interface as the primary audio device.
This is important to ensure that your recordings are played from the studio monitors or studio headphones rather than your computer speakers.
(b) Select your audio interface as your primary input / output device on your DAW
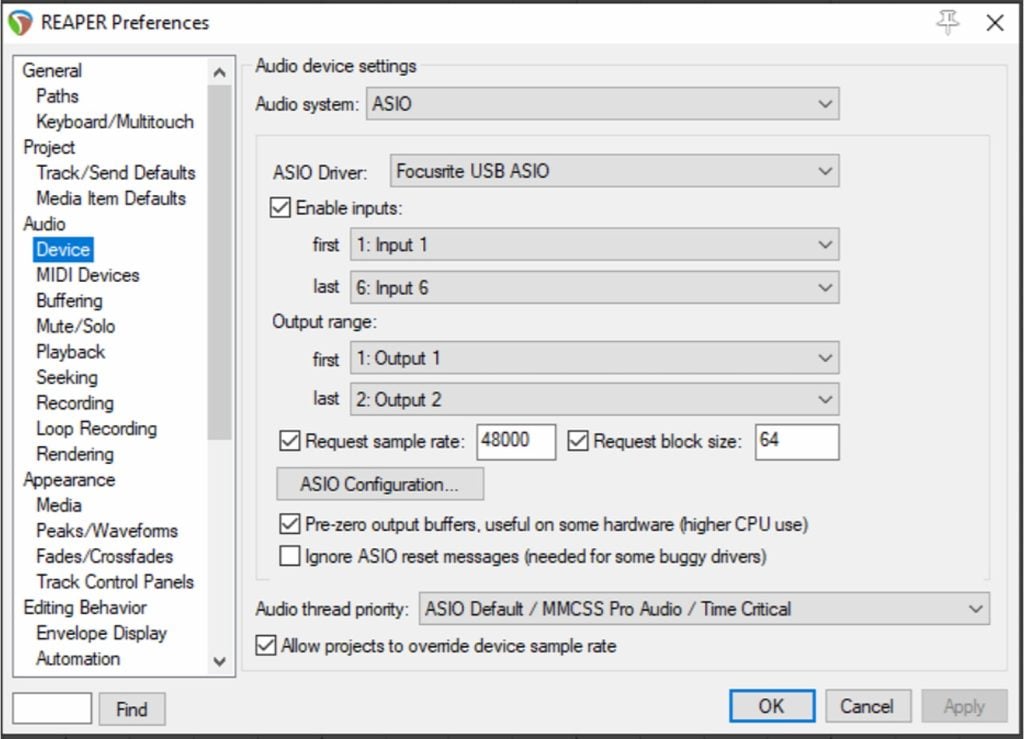
Go to your DAW software and locate your audio interface from the list of “Connected Devices” in the drop down menu. Adjust the sampling rate and buffer size. Each DAW is different, but they will give you some sort of option to select your primary input / output as your interface.
Be sure to set your audio interface as your input and output device on the DAW – this will route all sound to the interface and to your studio monitors, and from your microphones to your DAW.
If you are using Reaper, you can do this by heading over to the “Options” menu in the top menu bar and select “Preferences”. Scroll down and select your audio interface as the primary device.
Once you have finished this step, it is time to start recording your first track!
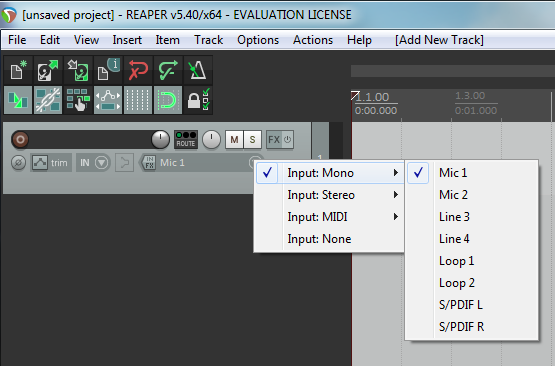
4. Configuring your DAW
On your DAW (for example, if you are using Reaper or Pro Tools), use input 1 to connect your microphone or condenser mic to record vocals. If your audio interface has a “Mic / Line Level” switch, be sure to change it to “Mic Level”.
Switch on the phantom power if you are using a condenser mic. Most dynamic mics such as the Shure SM58LCs don’t need this, but if you are using a condenser you will need to supply phantom power to the mic.
Use input 2 for recording instruments such as your acoustic guitar. Again, if your audio interface as a “Instrument / Line Level” switch, you should change it to “Instrument Level” If you are recording instruments.
If you are recording vocals through a microphone, you should turn down the volume on your studio monitors to prevent your studio monitors from being recorded! You should use studio headphones when recording vocals.
5. Record tracks with your DAW
The next step is to assign your interface channels to the right tracks in your DAW.
On your DAW, select the track that you want to record to (e.g., track 1, track 2, track 3) – usually you can record either to a single track or multiple track.
All professional DAWs such as Pro Tools, Reaper and FL Studio will offer multitrack recording where you can combine all your tracks later.
6. Recording electric guitar / bass with an audio interface
Create a new track on your audio interface and assign the input to the track. If you are using Input 1 on your interface to record electric guitar, you will need to remove your microphone connection and insert the electric guitar cable into the interface.
You will need to select the track that you are recording on your DAW (for example, track 3) and assign input 1 to track 3 on your DAW before recording.
Next Steps
For a detailed guide on the essential equipment you need to get started with recording at home, check out these posts: